How to test new ideas in your .Net projects quickly and safely with git
05 Nov 2020
Let’s face it – often you just need to get down and dirty, quickly sketch up some code to see if your idea of a bugfix or a feature is going to work.
Sometimes you can whip up some C# code using C# Interactive window in Visual Studio, or an online
C# REPL (see this article for more info on that).
But a lot of times you DO need to make changes to your existing project(s), just because of all the other stuff, like DB access, authentication, other APIs responses, routing, dependency injection etc. that is needed to test your brand spanking new idea.
Also, you don’t want to accidentally break already working code and want to be able to roll your changes back quickly if it doesn’t work and you need to pull the plug on it.
That’s where the ![]() magic
magic ![]() of
of Git comes in! (well ok, not magic, but a cool
distributed graph theory tree model, however, any sufficiently advanced technology is
indistinguishable from magic)
Overview
Before we dive deep into the process, let’s have a quick overview of what it looks like. Here is a simple flow diagram:
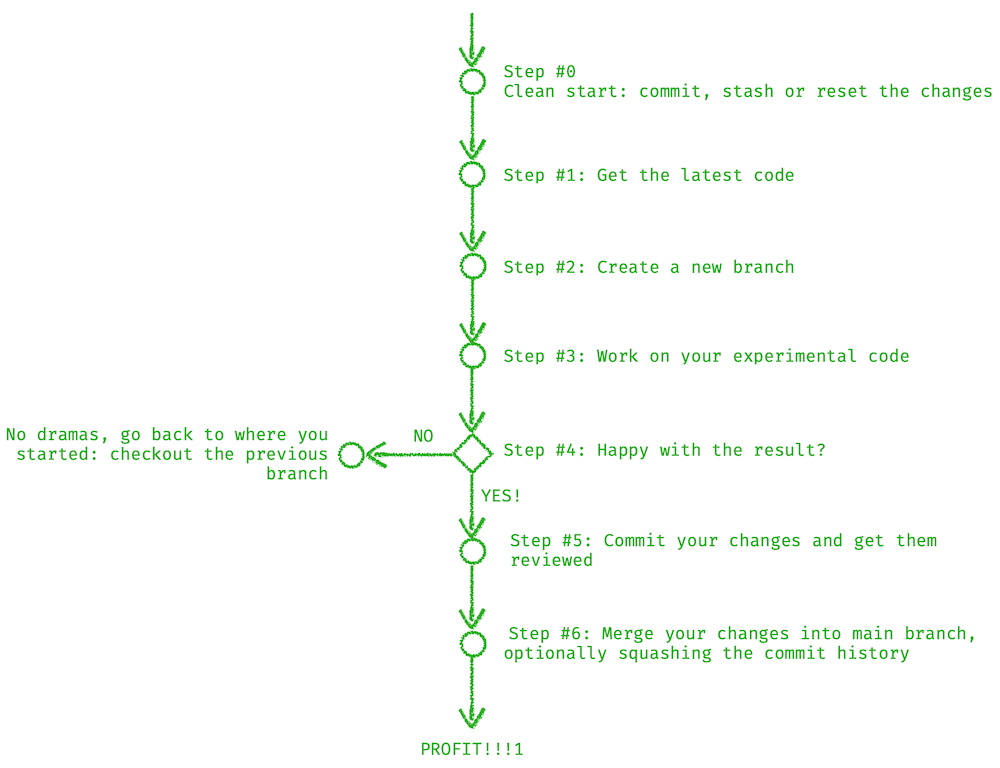
Step #0: Start with a clean slate
This is very important: you need to make sure there are no uncommitted changes left hanging around in your working folder. If you have any modified files, you can do one of the following:
- commit your changes if you’re happy with them,
git commit -a -m "<your commit message>" - stash them for later use with
git stash, and when you are done experimenting and cleaning up, bring them back withgit stash apply - blow them away if they are not needed - but beware, you won’t be able to bring them back:
git
reset HEAD --hard
Step #1: Get the latest code
Make sure you get the latest code of whichever branch you’re starting your experimentation. If
the master is your stable branch, switch to it and get the latest code:
git checkout master
git pull
Step #2: Create a new branch to run your experiment on
Now you are going to need to create a separate branch on which to experiment, so that your changes could be reviewed by other devs, and to avoid getting it all mixed up with any other changes.
Make sure to give meaningful names to your branches – something that conveys the purpose of the change you’re making. If it looks like your change is going to be big and affect lost of areas of the codebase, consider creating separate branches for each logically self-contained unit of change.
git checkout -b <your-new-branch-name>
git push origin <your-new-branch-name> -u
Step #3: Work on your idea
Now everything is ready for your grand idea – go ahead, write your code. It’s a good practice to commit your changes now and then, particularly when you get something to work the way you wanted. This gives you a point in your source control history to revert to if things break.
// do some coding
git commit -a -m 'X is working now; Y refactored to abstract class;'

// do some more coding
git commit -a -m 'All classes deriving from Y now'
Step #4: Happy with the results?
Now it’s up to you to decide if your experiment was a success - and as it often happens, we don’t get there right away, and that’s OK. It’s totally fine to put things on the back burner, put it all on hold, and give your brain some time to process things.
If you need to do switch to another task in the meantime, just commit whatever you’ve got and then switch back to your main branch:
git commit -a -m 'Not quite working, just putting it on hold here'
git checkout master
However, if you are happy with the results, onwards and upwards!
Step #5: Commit your changes
Now is the time to commit your changes, get them reviewed by other devs. The review process is likely to result in more changes, and you might be repeating steps #4 and #5 a few times.
Step #6: Merge your changes
When the code review is complete, you can merge them into your main branch.
git checkout master
git merge <your-new-branch-name>
Alternatively, you may want to clean up your commit history by squashing all of the intermediate commits in your experimental branch into one succinct commit with a comprehensive description of all changes:
git checkout master
git merge --squash <your-new-branch-name>

// 'git commit' with no arguments will bring up your default text editor so you can write up a commit message
git commit
Conclusion
I hope this article helped you to learn how to use git more efficiently and to freely
experiment with your code without the fear of breaking anything or losing your changes.
Liked this article? There is more where it came from – sign up to my mailing list and receive new blog posts when I publish them. I never spam or give your email to anybody, and you can unsubscribe whenever you want.