How to call a JSON API and display the result in ASP.NET Core MVC
15 Oct 2019
In today’s world of interconnected apps & services, you may often need to call another API to get or modify information.
In this article I’d like to show you how to do the following:
- call another API in a reliable fashion
- receive and parse the result so that your app can work with it
- display the result on a web page
Let’s get on with it!
Setting your project up
This tutorial uses ASP.NET Core 3 MVC. If you are using a different version, some of the steps may need to be modified.
If you are starting from scratch, you can just create a new ASP.NET Core MVC project by running the following command:
dotnet new mvc -o MyMvcAppwhere MyMvcApp is the name for your new project. If you already have a project, ignore this step.
Given your app will be calling some remote API, you want to make sure that in case of a flaky
connection or a timeout it’s going to re-try to eventually get the data. That’s why you going to
need to add a reference to Microsoft.Extensions.Http.Polly package. To read more about Polly and
re-try policies, check out this article: “Implement HTTP call retries with exponential backoff with
HttpClientFactory and Polly policies”
So, to add this package, run this command from your project folder (that’s where your .csproj
resides):
dotnet add package Microsoft.Extensions.Http.PollyAlso, you’ll need a Newtonsoft.Json package so that you could turn all this JSON into neat C# objects that are easier to work with. So go ahead and run this command to add it:
dotnet add package newtonsoft.jsonHaaang on, wait, but why do I need all this?
There are several approaches and classes you may use to call external APIs, and you might have come across
some of them already - classes like WebClient or HttpClient. While still working, they provide
quite manual and low-level access to APIs. However in web apps, since they may have several threads
running and calling different APIs, you want to let the application manage creation, re-use and
disposal of these resources.
That’s why one of the recommended practices at the moment is to use Http Client Factory pattern.
That is a standard part of .NET Core, and it takes good care of things like configuring
HttpClients, managing creation and disposal of them (to avoid socket exhaustion, that’s when OS
runs out of available network sockets) and does a few more things for you – see here for the
complete list.
Also, feel free to check out all the use cases of the Http Client Factory here – the class is easy to use and examples are quite clear.
You will also need Polly (the package you just installed above) to add retry policies.
Configuring your web app
Add the following code to the Startup.cs file:
// Add this line to your 'using' section:
using Polly;

//
// ...existing code already there...
//
        // Add this code into your 'ConfigureServices' function:
        public void ConfigureServices(IServiceCollection services)
        {
            // Existing code, most likely you already have it there
            services.AddControllersWithViews();

            // Now let's register an API client for your AJAX call.
            // Includes the configuration - base address & content type.
            services.AddHttpClient("API Client", client => {
                client.BaseAddress = new Uri("https://www.metaweather.com/");
                client.DefaultRequestHeaders.Add("Accept", "application/json");
            })
            // Add the re-try policy: in this instance, re-try three times,
            // in 1, 3 and 5 seconds intervals.
            .AddTransientHttpErrorPolicy(builder => builder.WaitAndRetryAsync(new[] {
                TimeSpan.FromSeconds(1),
                TimeSpan.FromSeconds(5),
                TimeSpan.FromSeconds(10)
            }));
        }
In this example we are going to use weather forecasting API from MetaWeather - it’s free and doesn’t need any API keys or other credentials, so should be easy to get working on your computer. Download complete, fully tested and working project for this article if you want to save yourself all the typing or if you run into any issues along the way.
Call all the APIs!
OMG can’t believe we actually got here after all this setup! Bear with me, we’re really close, soon you’ll be getting that sweet JSON and displaying it!
First of all, you’ll need to create a class (or set of classes) to represent your JSON structures in C#. Luckily, there’s a web app for that! Head to http://json2csharp.com/, paste your expected JSON response in there, click ‘Generate’ and you’ll get your C# class(es).
I am going to use this MetaWeather API response to generate C# classes. Feel free to change the generated class names, however, do not change the field names, as those need to match your JSON.
In my case, I get something like this:
  public class WeatherForecast
  {
      public List<ConsolidatedWeather> consolidated_weather { get; set; }
      public DateTime time { get; set; }
      public DateTime sun_rise { get; set; }
      public DateTime sun_set { get; set; }
      public string timezone_name { get; set; }
      public Parent parent { get; set; }
      public List<Source> sources { get; set; }
      public string title { get; set; }
      public string location_type { get; set; }
      public int woeid { get; set; }
      public string latt_long { get; set; }
      public string timezone { get; set; }
  }
Now it’s time to call the API, and turn the response into an instance of that freshly created class. In one of your controllers, add the following code:
// Reference Newtonsoft
using Newtonsoft.Json;

// ... other code...

    private async Task<WeatherForecast> GetWeatherForecasts()
    {
        // Get an instance of HttpClient from the factpry that we registered
        // in Startup.cs
        var client = _httpClientFactory.CreateClient("API Client");

        // Call the API & wait for response.
        // If the API call fails, call it again according to the re-try policy
        // specified in Startup.cs
        var result = await client.GetAsync("/api/location/1103816/");

        if (result.IsSuccessStatusCode)
        {
            // Read all of the response and deserialise it into an instace of
            // WeatherForecast class
            var content = await result.Content.ReadAsStringAsync();
            return JsonConvert.DeserializeObject<WeatherForecast>(content);
        }
        return null;
    }

    public async Task<IActionResult> Index()
    {
        var model = await GetWeatherForecasts();
        // Pass the data into the View
        return View(model);
    }
Things to pay particular attention to:
- Notice how we get an instance
HttpClientwith the help ofHttpCientFactory result.IsSuccessfulStatusCodeneeds to be checked before proceeding to retrieve the responseJsonConvert.DeserializeObject<WeatherForecast>()call does all the magic of converting JSON response in string form to C# class instance
Showing the result
Now is the easy bit – you already have your strongly-typed model, representing the JSON result, and you can render it to the user:
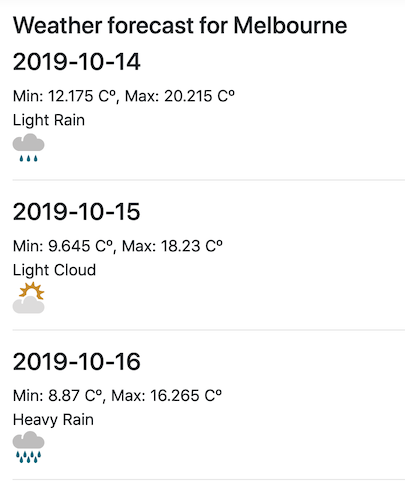
@model WeatherForecast;
<div class="text-left">
    <h1 class="display-4">Weather forecast for @Model.title</h1>
    @foreach (var forecast in Model.consolidated_weather)
    {
        <div>
            <h4>@forecast.applicable_date</h4>
            <div>Min: @forecast.min_temp Cº, Max: @forecast.max_temp Cº</div>
            <div>@forecast.weather_state_name</div>
            <img src="https://www.metaweather.com/static/img/weather/@(forecast.weather_state_abbr).svg" style="width:32px"/>
            <hr/>
        </div>
    }
</div>
Which gives us something like this:
Conclusion
In this article, you have just learnt how to:
- Set up your project to call remote APIs in a reliable, production-ready manner
- Generated C# class(es) to contain data from JSON API that you are calling
- Call the API & deserialse the result into instances of C# class(es)
- Display the result on the page
Get complete, tested, and working source code for this article
Download fully tested and 100% working Visual Studio solution with the source code used in this article for FREE – just enter your name and email in the form below, and I’ll send you the download link right away.
You will also get access to all the source code for all existing and new articles on the site, and access to my mailing list, which receives handy timesaving tips on .NET Core programming.